Before starting to deploy your Hazelcast Enterprise cluster, make sure that you have a valid license key for Hazelcast Enterprise version. You can get a trial key from this link.
Creating Volume and Loading Custom Configurations
This is a prerequisite step for the next section if you have custom configurations or JARs.
Moreover, OCP 3.5 installations on cloud providers like AWS may not contain Persistent Volumes(PV). In that case, you first must create a PV to deploy Hazelcast cluster with hazelcast-template.js .
In order to share custom configurations or custom domain JARs (for example EntryProcessor implementations) between Hazelcast Pods, you need to add a persistent volume in OCP. In hazelcast-template.js this directory is named as /data/hazelcast, and it should be claimed. Below, you can find how to add a persistent volume in OCP. Please notice that it is just an example of a persistent volume creation with NFS; there are many different ways that you can map volumes in Kubernetes and OpenShift Platform. You can find the available volumes via this link
- Login to your OCP console using the command
oc login <your-ocp-url>withsystem:adminuser or rights. - Create a directory in master for the physical storage as shown below:
mkdir -p <your-pv-path>
chmod -R 777 <parent-path-to-pv> [may require root permissions]
# Add to /etc/exports
<your-pv-path> *(rw,root_squash)
# Enable the new exports without bouncing the NFS service
exportfs -a
NFS Security provisioning may be required, therefore you may need to add nfsnobody user and group to <parent-path-to-pv>. Please refer to this link for details.
- Open a text editor and add the following deployment YAML for persistent volume:
apiVersion: v1
kind: PersistentVolume
metadata:
  name: <your-pv-name>
spec:
  capacity:
    storage: 2Gi
  accessModes:
    - ReadWriteOnce
    - ReadWriteMany
  persistentVolumeReclaimPolicy: Retain
  nfs:
    server: localhost
    path: <your-pv-path>
Save this file. Please also notice that Reclaim Policy is set as Retain. Therefore, contents of this folder will remain as is, between successive claims.
your-pv-name is important and you need to input this name to HAZELCAST_VOLUME_NAME during deployments with hazelcast-template.js.
- Run
oc create -f <your-pv-yaml>which will create aPersistentVolume. - Run
oc get pvto verify, and you should seeSTATUSasAVAILABLE. - Go to
<your-pv-path>and copy your custom Hazelcast configuration ashazelcast.xml. You may also copy or transfercustom jarsto this directory. Make sure that your custom configuration file is named ashazelcast.xml. You may usescporsftpto transfer these files.
If you need to redeploy Hazelcast cluster with hazelcast-template.js, first you may need to remove the logical persistent volume bindings, since their creation policy is RETAIN. In order to delete or tear down, please run the following commands:
-
oc delete pvc hz-vc(hz-vc is the claim name from Kubernetes template, you do not need to change its name) -
oc delete pv <your-pv-name> -
oc create -f <your-pv-yaml>
Please note that contents of your previous deployment is preserved. If you change the claim policy to RECYCLE, you have to transfer all custom files to <your-pv-path> before each successive deployments.
Deploying on Web Console
-
In the web browser, navigate to your OCP console page and login.
-
Your login user should have required access right to start Docker registry and push images as described in Building and Deploying to Private Docker Registry section of this document.
-
Create a project with
your-project-name: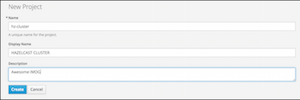
-
Turn back to OCP shell and switch to your new project with the command
oc project <your-project-name>. -
Add the private Docker registry to your project
-
Please refer to this link for details.
-
Or you may create an infrastructure project to deploy your project
imagestreams.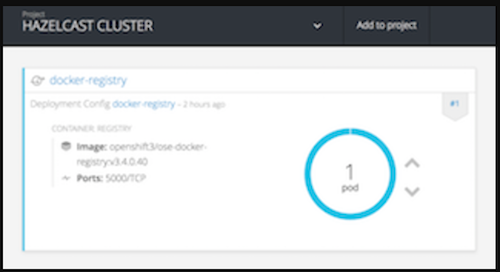
-
Add route for the newly created Docker registry. Please assign
passthroughfor TLS setting: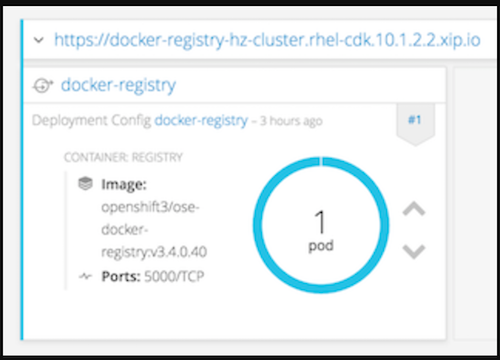
-
Push your Hazelcast Enterprise image to this registry, as described in section Pushing Image to Private Docker Registry in OCP.
-
To verify the pushed image in OCP, you can run the following command:
oc get imagestreams
You should see <your-image-name> under NAME column as below. For the below example, it is named as hz-enterprise.
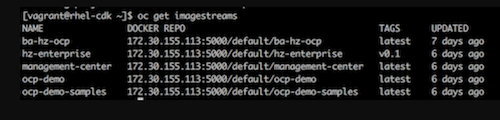
Another important point is the DOCKER REPO entry for image. In the following steps we will use this path in kubernetes-template.js to pull the base image for our Hazelcast cluster.
-
Click
Add to Projectand thenImport YAML/JSONto start deploying Hazelcast cluster on OCP. -
Copy and paste the contents of
kubernetes-template.jsonto the editor, or browse and upload it. -
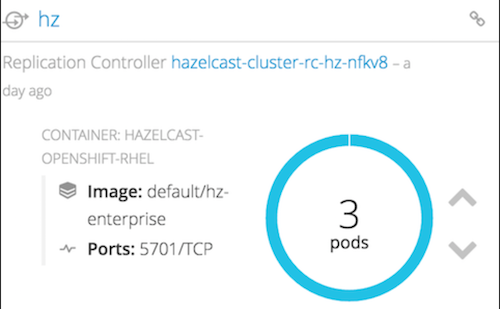
This template file contains all the deployment information to setup a Hazelcast cluster inside OpenShift. It configures the necessary
ReplicationController, health checks and image to use. It also offers a set of properties to be requested when creating a new cluster (such asclustername). -
Fill out the
Configuration Propertiessection. -
NAMESPACEvalue is important and should match with your project namespace. -
Change
"image": "hazelcast/hazelcast-openshift-rhel"to"image":"<registry-route>/<your-namespace>/<your-image-name>" -
Enter your Hazelcast Enterprise license key to
ENTERPRISE_LICENSE_KEYinput section. -
Enter
<your-pv-name>toHAZELCAST_VOLUME_NAMEinput section. -
If you do not need any custom XML or JAR, you can give a
PersistentVolumename which may already created in OCP. You can get them viaoc get pvcommand. Please note that these volumes haveRECYCLEclaim policy. Also, installations on the cloud providers may not have these volumes. -
Now it is ready to go.